Hey everyone,
We’ve just pushed an update that got our Asset Manager into a working state so I figured this would be a good time to make a guide for basic modding. We want people to really take advantage of the possibilities that modding opens up, and this means getting your own items and reskins into the game should be as simple and straightforward as possible.
First off, you’ll be happy to know that mods in multiplayer only need to be installed on the host’s server, if you want to join a modded server you don’t have to install any of the mods yourself! Secondly, before we begin it’s worth noting that you will need to reinstall your mod after any updates as the “mods” folder will be cleared, so make sure to keep backups of any content you create or download. And lastly, at the moment, any modded installation will be considered as failing validation so don’t panic, you haven’t done anything wrong!
Okay, let’s get started.
Making the voxel model
The first thing you’ll need to do is get yourself a voxel editor. Our artist, SteampunkStein, uses Qubicle (http://www.minddesk.com/) but MagicaVoxel (https://voxel.codeplex.com/) is a good free alternative. We’ve also heard some great things about VoxelShop (https://blackflux.com/node/11) from our modders. Basically any editor of your choice that can export to .qb format. Our wiki is going to be updated with more info regarding different voxel editors and the differences between them soon.
Quick note regarding “layer names”. If you’re modding heads, clothing or character items the layer names have to be correct. As we’re just making a simple object you can place in the world we don’t need to worry about that. Like I mentioned before, our wiki will be updated with more information regarding this soon, but one thing you should make note of is that MagicaVoxel doesn’t support multiple layer names.
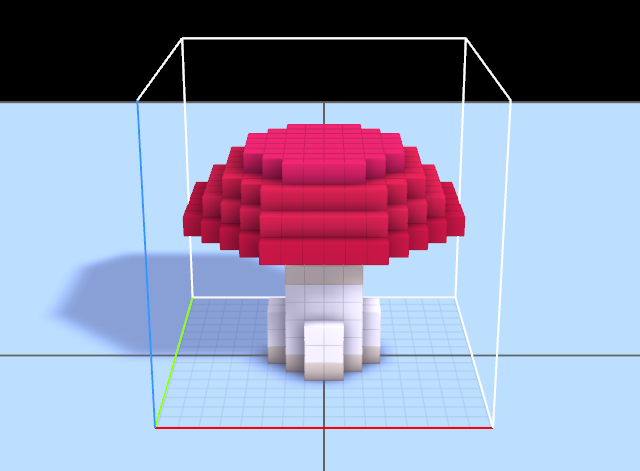
Now it’s time to start making the items you want. There are no colour restrictions, but it’s best if you try and stick to multiples of 16x16x16 grids. For example if you want to make your item taller than one block, you’d use 16x16x32, longer than one block would be 32x16x16 etc.
When you’re finished designing your model you’ll need to save it to the mods folder as a .qb file. The default path to the mods folder is “%localappdata%/Local/staxel.launcher/gamedata/content/mods” and while not completely necessary, it would be a good idea to make a new folder for each modpack you create to avoid any confusion later on.

Now that you have your .qb model you’ll need to generate a .tile file to accompany it in your mod folder.
There a two ways to generate .tile files. Firstly, you could write one yourself in your favourite text editor, (which is what we’ll be doing in the first example) we’ll call this “Method A”. Secondly, you could use Staxel’s Asset Manager (we’ll call this “Method B”). This option will make the process a lot easier for players who don’t have much experience with modding. If you are still struggling to get your mod into the game after trying both of these options then you should have a look at the “modding wiki”. This wiki can be edited by anyone so, although there isn’t much info on there at the moment, it will be a constantly growing article with the latest relevant information available.
Method A – Writing a .tile in a text editor
Okay so, the easiest way to start writing your own .tile file would be to have a look at the .tiles already available for Staxel’s own assets. You can find them in “%localappdata%/Local/Staxel.Launcher/gamedata/content/staxel”. Try to find an asset that behaves similarly to the way you want your item to be used in the game. We’re making a mushroom so we’ll use a flower .tile (in this instance “Allium_blue_1” which can be found in /content/staxel/plant/flowers/ Allium_blue_1.tile).
Start off by making a copy of the .tile and pasting it into the mod folder that contains your .qb file. Now open it up in notepad (or the text editor of your choice) and you should see something like this:
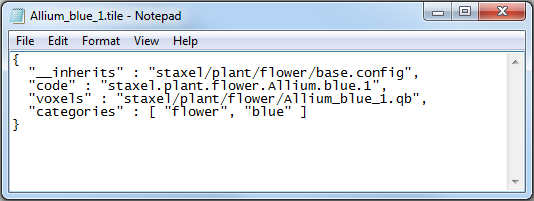
It might look confusing at first but it’s actually pretty easy. For a simple item the only properties you need to change are the following:
“code” is the I.D of the asset, you can change this to anything you want but it’s encouraged that you use “mods.” as the prefix for your mod assets to avoid any filename conflicts with Staxel’s own assets. It’s good practice to always make your asset code reference it’s directory as well. For example our mod has the path “mods/testmod/LargePinkMushroom”, so we will give this mod the asset code “mods.testmod.LargePinkMushroom”
“voxels” is the file location (within the “content” folder) of the .qb model that you want to associate with this .tile file. You’ll need to change this to point to your own .qb so we’ll change it to “%localappdata%/Local/Staxel.Launcher/gamedata/content/mods/testmod/LargePinkMushroom.qb”
“categories” are the keywords that the in-game inventory’s search function will use to filter items from the catalogue, pick some words that describe your item’s design and replace the ones here with those. Since we’re making a pink mushroom we’ll use the tags “mushroom”, “toadstool”, and “pink”.
Now save the .tile file with the name that matches the .qb file.
At this point you should now have the two files you need in your mod folder and you’re ready to get them into the game. For this last step you’ll need to use Staxel’s Content Builder (default location is “%localappdata%\Local\Staxel.Launcher\gamedata\bin\Staxel.ContentBuilder.exe”). All you need to do is start the program, click “Validate Resources” and if you’re putting them on a server click “Upload to server”. This will also create a cache file for the asset in your mod’s folder (this step applies to installing 3rd party mods as well after placing them in the “mods” folder).
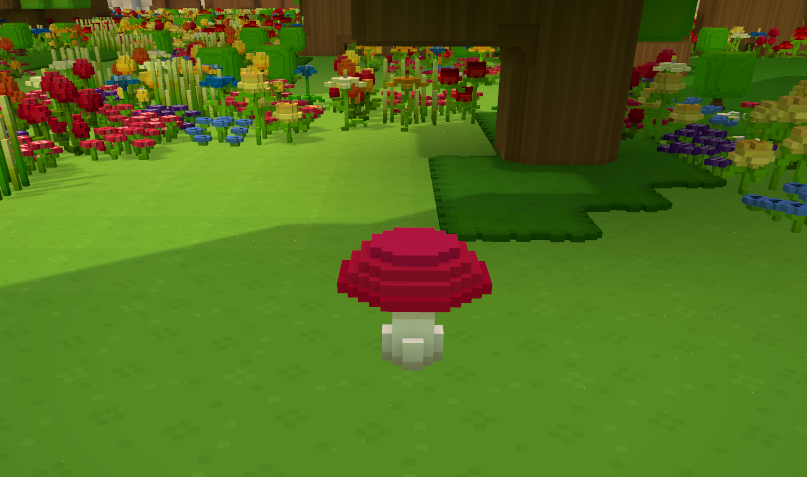
And that’s it! Your first Staxel mod should now be available in the game so all that’s left to do now is go and try it out!
Method B – Generating a .tile with the Asset Manager
The Asset Manager does what it says on the box. You can use it as an interface to see the locations and configurations of all the assets in Staxel. For this tutorial though we’ll just be covering a simple way to get your items working in the game, a more in-depth guide will be available at a later date so again, keep an eye on the modding wiki at http://wiki.playstaxel.com/Modding.
Firstly, you’ll need to open the Asset Manager (default location is “%localappdata%/Local/staxel.launcher/gamedata/bin/Staxel.AssetManager.exe”)
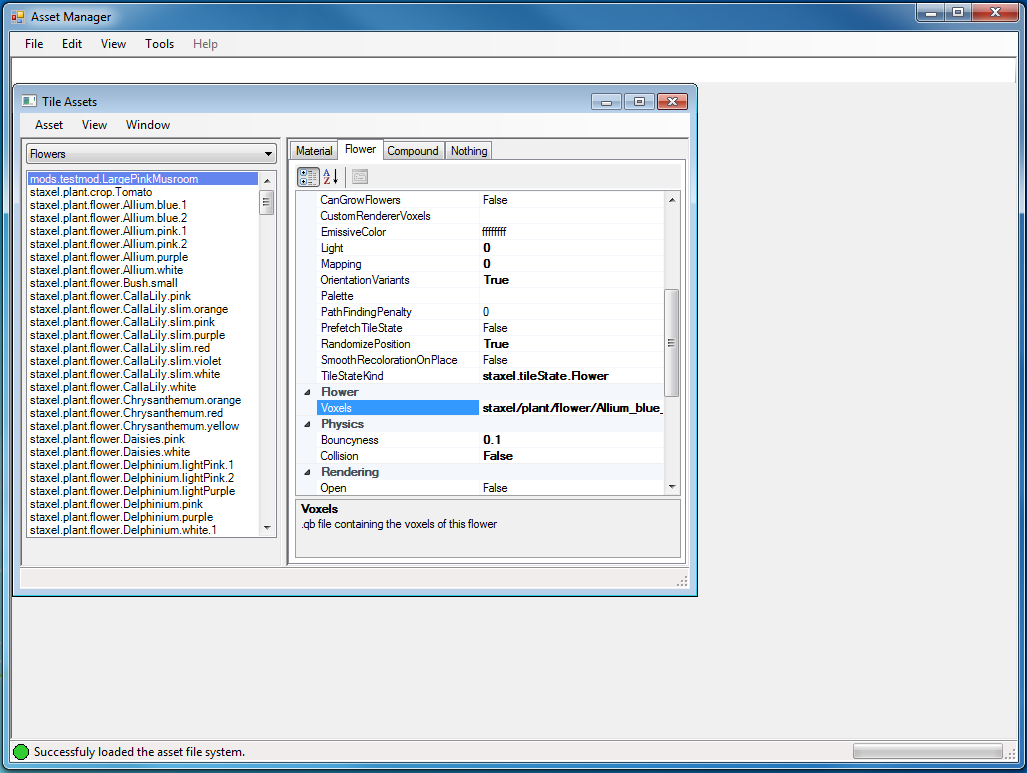
In the Asset Manager‘s main window you would open the “View” menu, and depending on the type of asset you’ve created, select the appropriate option. We’ll be using the “Tile Assets” type in this example. Choosing this will open a list showing all of Staxel’s assets of the “Tile Assets” type. So right now, at the top of this new window (below the menu) we have a drop-down list with different kinds of Tile Assets. We’ll select “Flowers” as they’re the most similar to the mushroom we’ll be modding in.
You can use this opportunity to have a look at the properties for all the flowers in the game, but for now we’ll just pick one to clone the configuration from that will be used to generate the new .tile file for your asset.
Once you’ve chosen one you’ll need to clone it by clicking “asset->add->clone asset” and then in the box that opens up we’ll change the settings to what we need for our own .tile file.
“Asset code” is the I.D of the asset, you can change this to anything you want but it’s encouraged that you use “mods.” as the prefix for your mod assets to avoid any filename conflicts with Staxel’s own assets. It’s good practice to always make your asset code reference it’s directory. For example our mod has the path “mods/testmod/LargePinkMushroom”, so we will give this mod the asset code “mods.testmod.LargePinkMushroom”
“Asset path” is where the new generated .tile file will be saved. You need to change this to the same folder as your .qb file and then add the new name of the .tile (it should be the same as the name of your .qb file). For the example we’ll change this field to “%localappdata%/Local/Staxel.Launcher/gamedata/content/mods/testmod/LargePinkMushroom.tile”
“Kind” We’ll leave this as “Flower”.
And with all the information replaced we’ll click “Ok”
Now we can take a look at our new asset which will be in the list of flowers. When you find it, click on it and you’ll see the configuration displayed on the right. Here you can edit all the information about the object you’re working on. Each parameter is pretty self explanatory. Now, we’re nearly done, we just need to tell it what .qb model to use so scroll down the config list until you find “Voxels” and then click on the filepath to change it to the .qb file in your mod’s folder. We’ll be using “mods/testmod/LargePinkMushroom.qb”.
The next step is to save the asset in the main window’s menu by selecting it from the list of flowers, and in the menu clicking Asset>Save>Asset. Finally we just need to build the asset, on the main menu click File>All Assets>Build and Validate assets.
Congratulations, our mod should now be in the game! That’s how to add a custom item using the Asset Manager.
The mod files we created for this tutorial can be downloaded here: playstaxel.com/mods/Staxel_Example_Mod.zip
That about wraps it up. Remember to check out the still growing modding wiki for more information on modding. If you have any questions or need any help feel free to post on our forums, or join us in our IRC channel.
Thanks for reading, now get out there and make some awesome mods!